Using solar power in your RV is a great way to enhance your camping experience by providing a renewable, eco-friendly energy source. It allows you to enjoy the comforts of electricity without being tethered to a traditional power hookup, giving you the freedom to camp off-grid in more remote locations. This guide will walk you through the benefits of using solar power, the components you need, how to set up a solar power system, and tips for maximizing your solar energy usage.
1. Benefits of Solar Power for RVs
Eco-Friendly Energy Source
Solar power is a clean, renewable energy source that reduces your carbon footprint and helps preserve the natural environment. By using solar panels, you rely less on fossil fuels and reduce harmful emissions.
Off-Grid Freedom
Solar power allows you to camp in remote locations without access to electrical hookups. This opens up a wider range of camping spots and provides more flexibility in your travel plans.
Cost Savings
While the initial investment in solar equipment can be significant, solar power can save you money in the long run. You’ll spend less on campground fees for electrical hookups and reduce the need for generator fuel.
Quiet and Low Maintenance
Solar panels operate silently and require minimal maintenance compared to generators. Once installed, they provide a hassle-free energy source that can last for many years.
2. Components of an RV Solar Power System
Solar Panels
Solar panels are the core of your solar power system. They capture sunlight and convert it into electrical energy. Panels come in various sizes and power ratings, so choose ones that fit your RV’s roof and meet your energy needs.
Charge Controller
A charge controller regulates the voltage and current coming from the solar panels to the battery. It prevents overcharging and protects the battery from damage, ensuring efficient and safe operation.
Battery Bank
The battery bank stores the energy generated by the solar panels for use when the sun isn’t shining. Deep cycle batteries, such as AGM or lithium-ion, are commonly used in RV solar systems due to their ability to withstand repeated charging and discharging.
Inverter
An inverter converts the DC (direct current) power stored in the batteries into AC (alternating current) power, which is used by most household appliances. Depending on your needs, you can choose between pure sine wave inverters and modified sine wave inverters.
Mounting Hardware
Mounting hardware is used to secure the solar panels to your RV’s roof. This includes brackets, bolts, and other fasteners designed to withstand the rigors of travel and various weather conditions.
Wiring and Connectors
Wiring and connectors link all the components of your solar power system. Ensure you use high-quality, appropriately rated cables to handle the current and prevent any electrical issues.
3. Setting Up Your RV Solar Power System
Assess Your Energy Needs
Before purchasing solar equipment, determine your energy consumption. Make a list of the appliances and devices you plan to use, and calculate their total power usage in watt-hours. This will help you choose the right size solar panels and battery capacity.
Choose the Right Solar Panels
Based on your energy needs, select solar panels with the appropriate wattage. Consider factors like available roof space, weight, and efficiency. Monocrystalline panels are more efficient and space-saving, while polycrystalline panels are more affordable but slightly less efficient.
Install the Solar Panels
Mount the solar panels on your RV’s roof using the provided hardware. Ensure they are positioned to maximize sun exposure and are securely fastened. Follow the manufacturer’s instructions for proper installation.
Connect the Charge Controller
Install the charge controller close to the battery bank. Connect the solar panels to the charge controller using the appropriate wiring. Then, connect the charge controller to the battery bank, ensuring correct polarity.
Install the Battery Bank
Place the batteries in a well-ventilated, secure location within your RV. Connect the batteries in series or parallel, depending on your voltage and capacity requirements. Connect the battery bank to the charge controller.
Set Up the Inverter
Install the inverter near the battery bank and connect it using suitable cables. The inverter should be grounded and installed according to the manufacturer’s instructions. Once connected, test the system to ensure it is functioning correctly.
4. Maximizing Solar Power Efficiency
Optimize Panel Placement
Position your RV to maximize sun exposure on the solar panels. Park in open areas without shade from trees or buildings. Adjust the angle of the panels if possible to capture the most sunlight throughout the day.
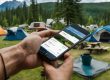
Monitor Your System
Regularly check the performance of your solar power system. Use monitoring devices or apps to track energy production and battery levels. This helps you identify any issues early and adjust your energy usage accordingly.
Conserve Energy
To make the most of your solar power, practice energy conservation. Use energy-efficient LED lights, minimize the use of high-power appliances, and unplug devices when not in use. This reduces the demand on your solar system and extends battery life.
Maintain Your Equipment
Keep your solar panels clean and free of debris to ensure optimal performance. Regularly inspect the wiring, connectors, and battery terminals for any signs of wear or damage. Address any issues promptly to maintain efficiency and safety.
Conclusion
Using solar power in your RV provides numerous benefits, including eco-friendliness, off-grid freedom, cost savings, and low maintenance. By understanding the components of a solar power system, setting it up correctly, and optimizing its use, you can enjoy a reliable and sustainable energy source for all your camping adventures. Embrace the power of the sun and enhance your RV experience with solar energy!